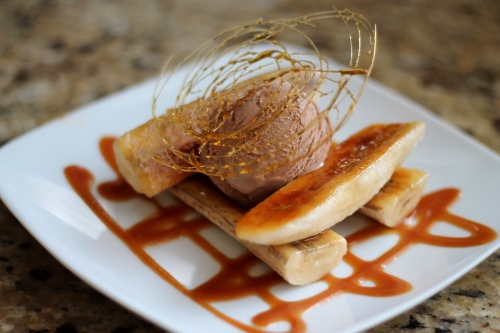
SUGAR!!! Still a little wired after making these recipes. Now, last episode here, sugar not so good…Sugar in this episode, VERY GOOD! If you’ve got a sweet tooth, you’re going to love this. We’re making candy, ice cream and brûlée. Oh, not to mention, it’s all in one dish!
Sugar does a lot of things…sweetening, flavor enhancing, preservation, fermentation, hydrolyzation and tenderization. What we’re going to do is add a little heat, water, and chemistry making some darn Good Eats!
So this episode didn’t include this chocolate ice cream; however, if I would have tried to serve my husband anything but chocolate ice cream, he would not have been happy 😉
Chocolate Ice Cream
 Add your cocoa powder into a pot
Pour in the half and half Whisk together

Bring to a simmer and remove from heat

Flex your muscles, it’s about to get serious. Add those yolks and whisk until they lighten in color.

Now SLOWLY add the sugar until it pales in color. This will take a little while. If your arm hurts, you’re doing it right!
 Temper the eggs into the chocolate mixture. Cook until it reaches 170 degrees and coats the back of the spoon and remains separate when finger is drawn down the back.

Cool mixture to 40 degrees and make according to your ice cream maker’s instructions.
Best Chocolate Ice Cream EVER!
Chocolate Ice Cream
Ingredients
1 1/2 ounces unsweetened cocoa powder, approximately 1/2 cup
3 cups half-and-half
1 cup heavy cream
8 large egg yolks
9 ounces sugar
2 teaspoons pure vanilla extract
Directions
Place the cocoa powder along with 1 cup of the half-and-half into a medium saucepan over medium heat and whisk to combine. Add the remaining half-and-half and the heavy cream. Bring the mixture just to a simmer, stirring occasionally, and remove from the heat.
In a medium mixing bowl whisk the egg yolks until they lighten in color. Gradually add the sugar and whisk to combine. Temper the cream mixture into the eggs and sugar by gradually adding small amounts, until about 1/3 of the cream mixture has been added. Pour in the remainder and return the entire mixture to the saucepan and place over low heat. Continue to cook, stirring frequently, until the mixture thickens slightly and coats the back of a spoon and reaches 170 to 175 degrees F. Pour the mixture into a container and allow to sit at room temperature for 30 minutes. Stir in the vanilla extract. Place the mixture into the refrigerator and once it is cool enough not to form condensation on the lid, cover and store for 4 to 8 hours or until the temperature reaches 40 degrees F or below.
Pour into an ice cream maker and process according to the manufacturer’s directions. This should take approximately 25 to 35 minutes. Serve as is for soft serve or freeze for another 3 to 4 hours to allow the ice cream to harden.
Recipe Courtesy of FoodNetwork.comBurned Peach Ice Cream
Add all ingredients, except fresh peaches in a pot. Bring to 170 degrees. Cool in covered container overnight.
Add ice cream mixture and diced grilled peaches to ice cream maker and you’re done!
This was incredible!
Burned Peach Ice Cream
Ingredients
2 cups half-and-half
1 cup whipping cream
1/2 cup sugar
1/2 cup peach preserves (not jelly)
1 vanilla bean, split and scraped
Pinch kosher salt
4 medium peaches, halved, seeded and grilled or broiled until brown
Directions
Combine all ingredients (including the bean and its pulp), except peaches, in a large saucepan and place over medium heat. Attach a frying or candy thermometer to inside of pan. (see note below) Stirring occasionally, bring the mixture to 170 degrees F. Remove from heat and strain into a lidded container. Cool mixture, then refrigerate mixture overnight to mellow flavors and texture.
Freeze mixture in ice cream freezer according to unit’s instructions. The mixture will not freeze hard in the machine. Meanwhile, chop peaches roughly. Once the volume has increased by 1/2 and reached a soft serve consistency, add the peaches and continue turning to incorporate. Spoon the mixture back into a lidded container and harden in the freezer at least 1 hour before serving.
NOTE: If you do not have a thermometer, bring the mixture just barely to a simmer. As soon as you see a bubble on the surface, remove it from the heat.
Recipe Courtesy of FoodNetwork.comBanana Splitsville
Add sugar, water and corn syrup to a pot over high heat

Heat to 230 degrees, then lower heat
Allow sugar to slowly darken in color and reaches 340 degrees
 Allow to cool slightly and swirl from a spoon on parchment paper. The technical name for these are doodads 🙂 It’s easy, just free form it and have fun!

Put sugar mixture back on heat and add half and half. Stand back…This will boil furiously! Continue to cook for 3 minutes, cool and put in a squirt container. Congrats, you just made caramel!
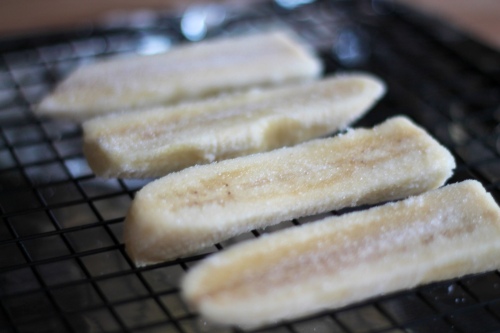
Dip the flat side in sugar
 Set on a cooling rack on top of sheet pan covered with aluminum foil
 Torch those babies until the sugar browns and starts to bubble
 Get your squirt bottle of caramel sauce and zig zag an easy yet fancy design on the plate

Lincoln log your quatered bananas
Add a scoop of ice cream, top with doodad and impress the heck out of your friends!
This is the adult version of a banana split, and WOW is all I can say! It takes a little time and there’s a few steps, but it’s so incredibly worth it!
Banana Splitsville
Printable Recipe
Ingredients
Basic Caramel Software:
2 cups sugar
1 cup water
1 tablespoon light corn syrup
Caramel Sauce Software:
1 batch caramel
2 cups heavy cream
Banana Brulee Software:
4 bananas
Sugar for coating
Additional Splitsville Software:
Ice cream of your choice
Hardware:
Small, heavy saucepan
Clean soup spoon
Candy thermometer (technically optional, but we suggest you use one until you get the hang of things)
Parchment paper
2 sheet pans or other heatproof surface
Aluminum foil
Cooling rack
Butane torch (available at most hardware stores — darned handy)
Safety goggles (see above)
Plastic squirt bottle (available at most grocery stores)
Directions
Combine the sugar, water, and corn syrup in a small, heavy saucepan and place over high heat. As soon as the sugar has dissolved, heat your thermometer under warm tap water (to prevent thermal shock) and attach to side of pan, making sure that the bulb is completely submerged. Do not stir the mixture or agitate the pan at this stage.
When the mixture reaches 230 degrees, reduce the heat to medium and allow the sugar to color gradually. As the temperature approaches 300 degrees the color will start to turn to amber. At this point, it’s safe to swirl the pan gently to help distribute the heat evenly. As the caramel heads towards 340 degrees, it will reach a deep amber color.
Remove the pan from the heat and slowly stir with a metal spoon, allowing it to cool until the caramel falls from the spoon in a solid stream, like a string. When it does, it’s doodad time.
Form doodads by holding the spoon 12 to 16 inches over the caramel and drizzling the patterns on the parchment. (Hint: allow the spoon to unload into the pan for a few seconds before attempting doodad. This will allow a narrower stream.) Quick back and forth motions or side to side movements are best. It’s all in the wrist. Allow doodads to cool for 15 minutes then peel the paper off (not the other way around). Stack in an airtight container with wax paper between each piece.
After making 15 to 20 doodads, you should have sufficient caramel remaining to move on to the sauce phase. So, return the remaining caramel to medium high heat and continue cooking until you see the first sign of smoke. Immediately remove from the heat, and add the cream, all at once, at arms length. (It will boil furiously.) Once the mixture calms down, return to medium heat and boil 3 more minutes, stirring occasionally. Cool to room temperature, move to squirt bottle and refrigerate for up to a week.
To make the bananas brulee, quarter the bananas (peel on) and rub into sugar to coat thoroughly. Remove peel and place on cooling rack over several layers of foil. (Don’t try this on your dining room table.) Don your safety goggles and fire up your torch. Hold the torch so that the very tip of the flame barely touches the banana, and move quickly back and forth until the sugar melts, turns brown, and bubbles. As soon as it looks like caramel, move on. You know you’ve got it down when a solid, glasslike sheet of gold (no graininess) has formed on the banana.
To do the split (so to speak), squirt a pattern of caramel sauce on a chilled plate, top with 4 banana pieces (Lincoln log style), top with the ice cream of your choice (we like our peachy vanilla from Churn Baby Churn), and finally, a doodad.
Recipe Courtesy of FoodNetwork.com


Pingback: Adult Banana Split | Sarah 'n Spice
Wow, that looks amazing! Those doodads are awesome! This seriously looks like something that would be served in a very expensive restaurant. Yum!!
LikeLike
It was amazing! Think Giada would hire me at her restaurant? Haha!
LikeLike
Pingback: Foodwhirl | Adult Banana Split
Pingback: Egg Files II | My Good Eats
Pingback: Salted Caramel Brownies | Sarah 'n Spice
Pingback: Salted Caramel Brownies